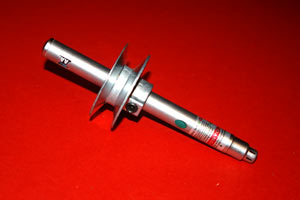
First, The closer you can get your mount polar aligned before using the polar alignment scope and/or drift method, the better. Here's a simple tool the help do the job. Use a small pulley that has a ½ inch shaft. Fit a green laser into the pulley, and with care, snug the set screw to the pointer. The opening for the objective lens of the polar scope is perpendicular to the scope axis. So, by holding the laser pointer up to the alignment scope opening, you can easily adjust the tripod and altitude setting of the mount to point to Polaris. This should easily put Polaris into view in the polar alignment scope.
Easier Polar Aligning
Here are some ideas to make polar aligning easier
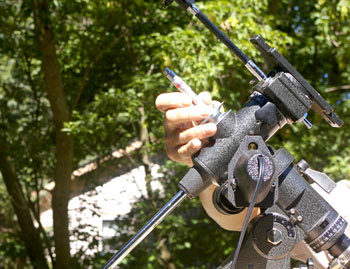
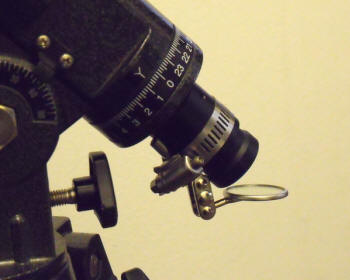
Second. Tired of twisting around trying to look through your polar scope? By attaching a mirror at 45 degrees, you can greatly improve your comfort in polar aligning your telescope. The photo at the right shows the use of a simple attachment. It was made from a small, flexible inspection mirror. Simply shorten the handle, and clamp it in place with a hose clamp. Grinding a flat surface on the handle improves stability.
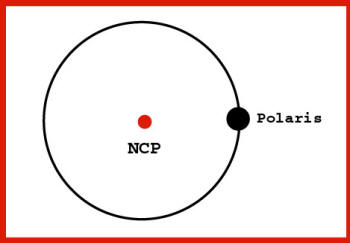
Third. The North Celestial Pole (NCP) is .7 degree from Polaris in the direction of Kochab. Even if the sky is clear, you're won't see Kochab in the polar aligning scope. Here's a solution. The reticle in your polar scope has a .7 degree radius circle. When your scope is polar aligned, NCP will be in the center of the circle and Polaris will be on the perimeter of the circle. An extended line drawn from Polaris through the NCP will point to Kochab. By knowing where Polaris
should be on the circle, you can easily polar align your scope. Two charts are available to help you.
The first chart, pa_std.pdf, is used for standard polar alignment scopes. In these scopes, images are upside-down and backwards. The second chart, pa_mir.pdf, is for polar alignment scopes that have a mirror attached, as shown above. These images are right-side-up, but backwards.
Download the chart that supports your setup. To use the chart, Select the month, chosest date and time, and read the angular position for Polaris on the circle. Important - Angular positions are not in degrees. For simplicity, angles are expressed in clock-minutes (1/60 of a revolution). For example, a value of 15 means Polaris is at 90 degrees from top.
To download the files, click here:
For standard polar alignment scopes
For polar alignment scopes that have a mirror attached
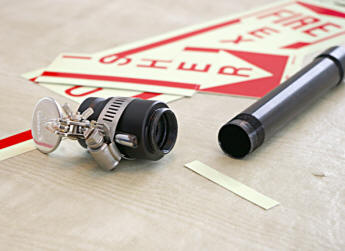
Fourth. Seeing the reticle and stars in your polar alignment scope at the same time is helpful. If your alignment scope isn't illuminated, however, this can be difficult. Finding a replacement illuminated scope can be expensive.
By inserting some glow-in-the-dark material into your alignment scope you might be able to do the job.
The material I used was cut from a glow-in-the-dark safety sign. I assembled 3 strips of material on some thin, flexible plastic. Had to do some experimenting to with get the size and position just right, and wound up with an approximately 2.5 x 2.5 inch piece. Curl the material and insert it in the main tube close to the the reticle. Couldn't find any red material, and had to use pale green.
When you're ready to do the aligning, simply shine a flashlight into the objective lens momentarily.
This is worth trying, but all risks are yours.
This fall and winter (2009-2010) in Wisconsin have been overcast and cold, so most of my "observations" were made using the free Stellarium program (stellarium.org). Feel free to use and share the attached alignment guides. If you have any questions, corrections, or comments, email: harvey@shermcraft.com.
Happy viewing.
Harvey Sherman
Hubertus, Wisconsin